The Easy Approach to EQ
EQ seems to be somewhat a mystery to many musicians and beginner home studio mixers. With this post I hope to lift that curtain of mystery a little bit. Whether you’re just starting out or are more experienced, the same principles apply. It’s good to remind yourself what EQ really is and what are the ways to use it.
What is EQ?
EQ is the most powerful tool in you disposal when it comes to mixing (after faders of course). But what EQ actually really is? It is just a volume knob. Nothing more, nothing less. It increases or decreases volume of certain frequencies. As simple as that, nothing mystical or magical.
The controls of EQ
It has three main controls to focus on: Frequency, Gain and Q/Bandwidth. Frequency chooses which frequency you want to increase or decrease. Gain chooses how much you increase or decrease the chosen frequency. Finally with Q you can choose the amount of how much you’re affecting frequencies on either side of the frequency you’ve chosen
In a typical parametric EQ there are a few different ways to increase or decrease the frequencies of your choice: filters, shelves and single band bell curves.
Filters
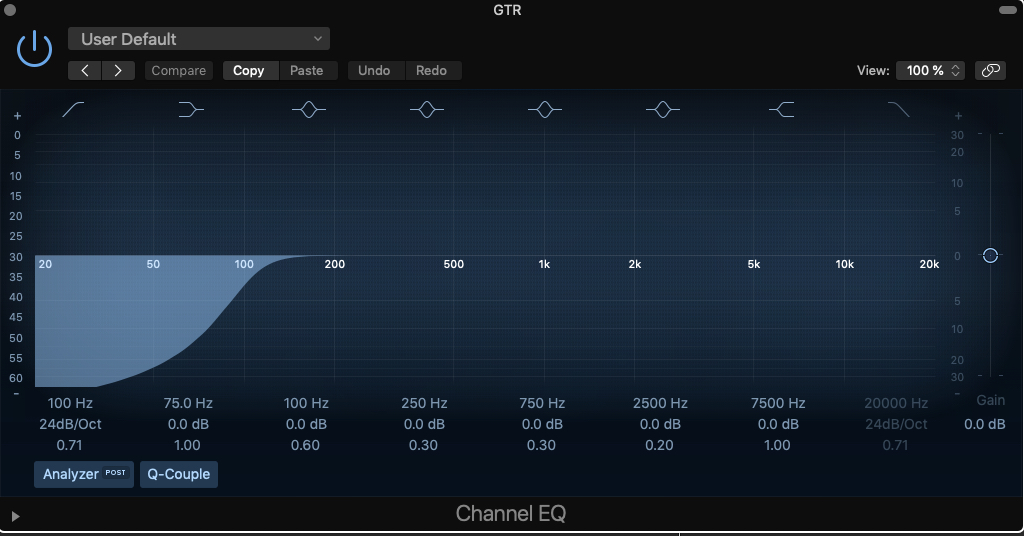
Filters let you cut all the frequencies below or above a certain frequency. Low cut filter set to 100Hz, cuts everything from 0 to 100Hz. Filter’s idea is to cut what you don’t need, any unwanted bass rumble or hiss to free headroom for other instruments. Instruments like guitars, pianos, synths and vocals don’t need that low end in a crowded mix. If you don’t hear it, you don’t need it. I find myself filtering out somewhere around 80-120Hz of these instruments.
Shelves
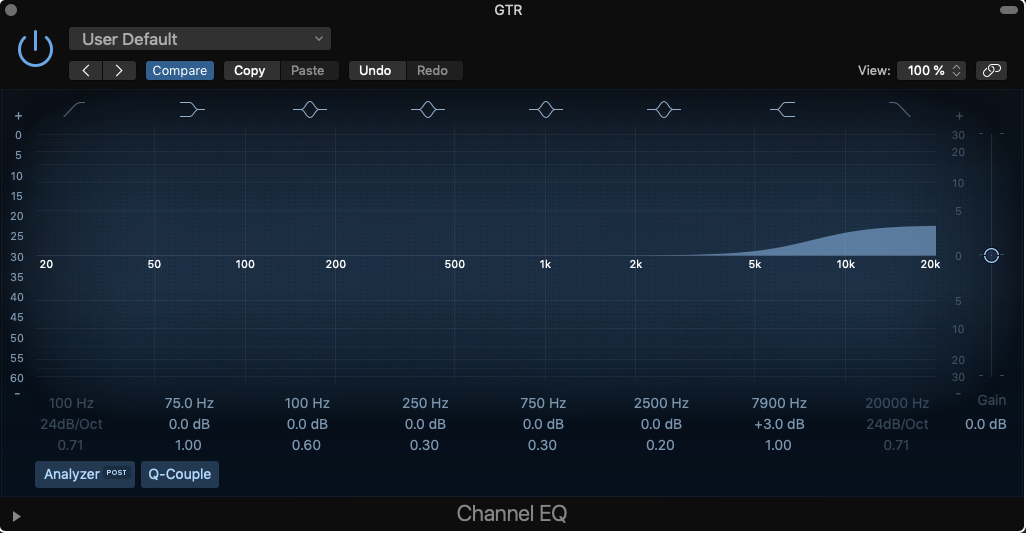
Shelves boost or cut below or above a certain frequency for a set amount. For example by using a high shelf boost at 8000Hz by 3dB, boosts everything from 8000Hz to 20000Hz by 3dB. For instance, shelves can be used to give your tracks more treble or bass. In case your instrument is way too bright, use high shelf to make it a slightly darker, and so on.
Bell curves
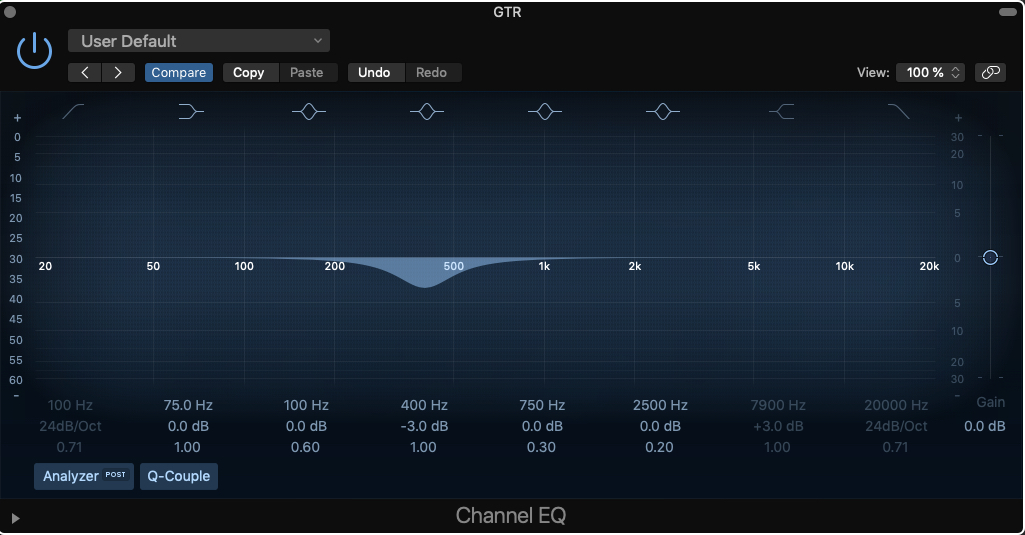
Bell curves boost or cut a certain frequency and the frequencies near it. Q/Bandwidth determines how much the other frequencies near it are boosted or cutted. Bell curves are your weapon of choice when you need to complete more precise cuts and boosts.
How to use EQ?
Now that you know what EQ is and what the controls are, let’s dive into using it wisely. There are basically two things you can do: cut or boost. These are called subtractive EQ (cut) and additive EQ (boost). With subtractive EQ you can remove bad sounding frequencies and make more room for the good stuff.
Additive EQ on the other hand is used to enhance the good stuff, not change the sound dramatically. I recommend to always cut before boost, because you get the bad sounding frequencies out of your tracks before you start enhancing them.
Cutting and boosting
When you’re cutting, use more narrower Q to only cut the frequencies you want to cut. This way you’re making the track lose nothing but the bad frequencies. With boosting you might want to use a bit wider Q for a more natural result.
Whether you’re cutting or boosting, a good way to find the frequencies is to use a large (9-15dB), narrow Q boost. Move it around until you find the bad frequency you want to cut or the good frequency you want to boost. Then make the Q a bit wider and cut or boost by 3dB at first. If it’s not enough, make it 6dB. EQ moves have a cumulative effect – they add up. Cut and boost all the tracks by 10dB and you’ll surely end up in a weird, unnatural sounding phase mess. This is why little moves here and there will take you a long way.
Match the level
Whether you’re using subtractive or additive EQ, be sure to match the level. We are easily fooled by our ears. If you boost the track, it becomes louder and you instantly feel it’s better. Turn down the output of the EQ so that it’s the same as the input. Use the input / output meters to check the volume. You can also check this by bypassing the EQ. Is it louder? Turn it down. Is it quieter? Turn it up. Don’t touch the fader. Touch the output of the EQ. Afterall the point is to change tone, not volume. Cutting makes a track quieter and boosting makes it louder – as said earlier, EQ is a volume knob.
Check with bypass
The other thing you want to be doing at all times is to bypass your EQ to check if you made the track better or worse. Turn it on and bypassed back and forth. Close your eyes while doing this to really focus. Don’t just throw EQ after EQ on a track, but ask yourself each time: did I change the tone or the volume? Is it better or worse? Did I achieve what I wanted to?
The main reasons for using EQ
The main task of EQ is to achieve a stable balance. There’s only so much room for frequencies in the “stereo field” and you have to get everything hearable. There’s a lot of competition between instruments.
Masking
If one of your instruments (let’s say a guitar) has a lot of energy in a certain frequency region (let’s say 100 Hz), your ability to hear other instruments at that same frequency region is weakened.
This is called masking. In this case your guitar track is sort of blocking your drum track at around 100 Hz. Although the drum track might sound full and punchy on it’s own, with the guitar it sounds a bit thin and dull. This is where EQ flies to the rescue. Cut few dBs around 100Hz from the guitar track to make room for drums.
When dealing with masking, you want to be listening the masked instruments as you’re EQing the masking instrument. When you’re cutting 100Hz from the guitar track, listen to the drums instead of the guitar to figure out how much you need to cut. Your guitar track may sound thinner on it’s own after this, but nobody’s going to listen to it by itself. This is why it doesn’t really matter how individual instruments sound solo as long as they serve the mix. Pay attention to the bigger picture in order to get everything balanced.
Carving
Now, there’s a technique called carving, which is basically a combination of cutting and boosting. Similar instruments have similar frequency responses so they tend to overlap with each other more often than not. With carving EQ you can make space for these tracks in the mix so they’re clearer and easily heard.
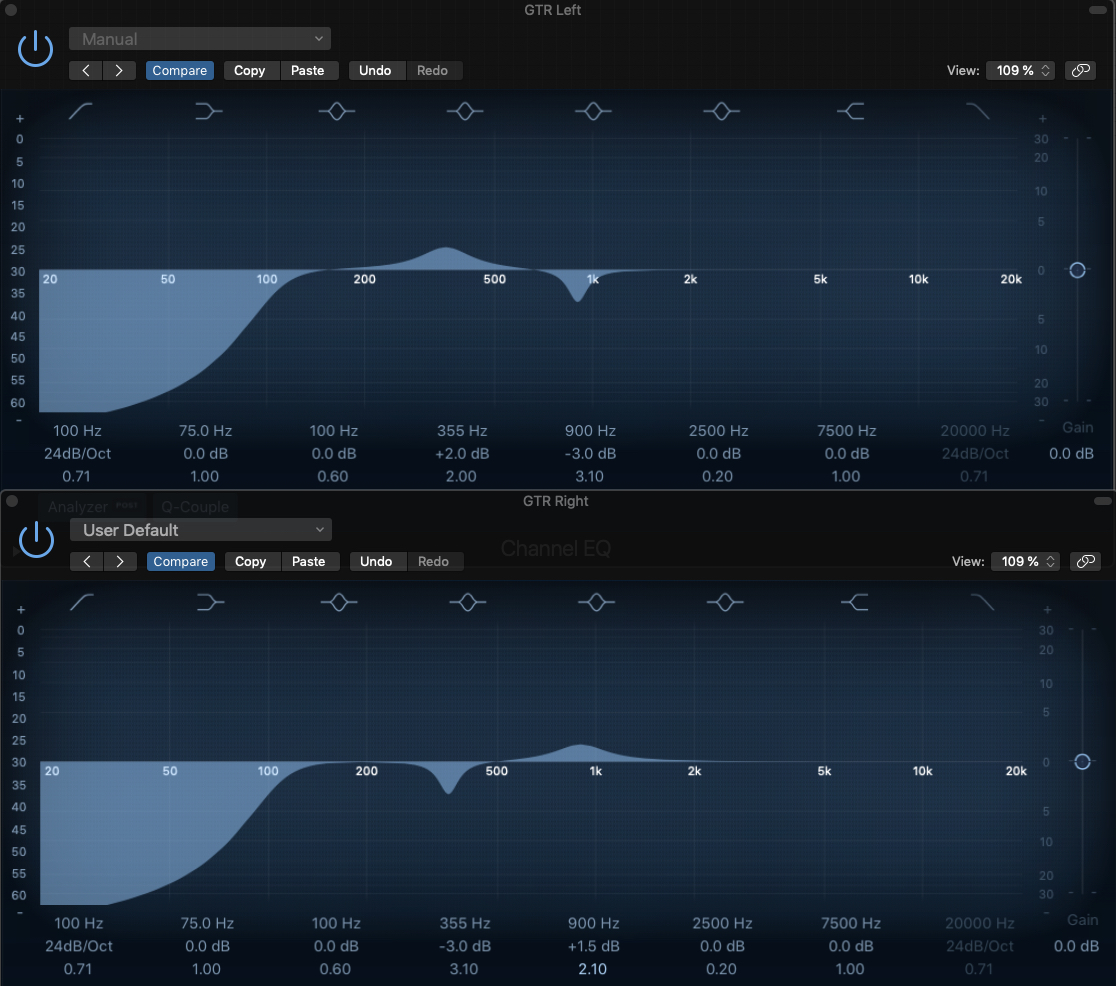
For example two rhythm guitars, one on the left and one on the right. Boost the left guitar from a good sounding middle frequency and cut the right guitar from that same spot. Do this the other way around too. Again use 3-6dB EQ moves. This ensures that the guitars are different tonally, so you can hear them better as they’re not masking each other. Your mix ends up sounding wider. Look at the picture below:
Mix Buss EQ
One move you can do with EQ is to use mix buss EQing. This means that your EQ affects all your tracks. Mix buss is like a master fader that all your tracks are routed to. You can fasten up the mixing process with less plugins by doing this. As the EQ affects all the tracks, use more subtle cuts and boosts (1-1.5dB) and go from there. This is a bit like mastering, done in the beginning of mixing, before any other EQ moves are done.
Using a mix buss EQ
You’ll filter out some of the low end on several tracks, so it’s all the same to cut some of it in the mix buss. I tend to cut 30Hz out of the entire mix. I’m not cutting too much so bass and kick don’t suffer. Going on – usually there’s a nasty muddy frequency that’s got to be cutted from every track. That’s often somewhere around 400-600Hz.
By cutting that right at the beginning you don’t have to go through it with every individual track. In addition, a bit of high frequency shelf boost is almost always in place to open up the top end of your mix. I find my self boosting from 8-10kHz upwards.
Reference
Reference a commercial pro mix of a similar genre to know what EQ moves to make. Compare and take a mental note: how does your mix differ from the pro mix? Does your mix lack bottom end or top end? Is you mix sounding a bit harsh or muddy? Use subtle moves and remember to match the volume.
Summary
So there you have it. It’s not rocket science, but it takes some practice to get it going. Although there are all these moves for EQ, not every track needs an EQ. If the track sounds good and sits well in the mix, then let it be.
One thing you don’t want to do is to use presets. The person who designed that particular preset has no idea what your track needs, use your ears instead. Trust your ears and not your eyes. It can be deceiving to look at the EQ curve. You’ll easily start to think things like “This doesn’t look good, it can’t be right..” and hear things that aren’t there. Close your eyes, it really helps you to listen and to focus. Remember – small moves add up.
I hope EQ isn’t much of a mystery to you anymore. Go and implement the stuff you just learned to your own songs. I guarantee you get better results with using EQ this way.
For more helpful content be sure to download my completely free guide 5 Steps to Create Music Faster.
Check out also: The Easy Approach to Compression
28 thoughts on “The Easy Approach to EQ”